What to expect from your unique iris photography photoshoot
Iris photography is a fascinating way to transform your eyes into a stunning, one-of-a-kind artwork. The process is quick, simple, and completely painless. If you’re curious about how an iris photography photoshoot works, this guide will walk you through each step, from booking your session to receiving your final artwork.
Step 1: Book your iris photography ticket
As I tour across the UK for my long-term photography project, I host pop-up iris photography events to fund my journey. These exclusive events allow you to have your iris captured in stunning high-resolution detail.
👉 Where to Book
You can view available locations, book your session, and pay online via my main website: eltoncilliers.com.
Once payment has been made, you’ll receive:
✅ A digital ticket via email.
Step 2: Attend your iris photography session
⏳ Session Duration: Each session lasts approximately 20 minutes, so please arrive no more than 5 minutes before your scheduled time.
⚠️ Late Arrival Policy:
- If you arrive more than 5 minutes late, I will try my best to accommodate you, but if my schedule is full, you may need to wait for an available slot.
- If no slots are available, I won’t be able to reschedule you on the day, so punctuality is crucial.
What Happens During the Session?
1️⃣ You will place your head onto an optometrist-style headrest (chin support and forehead frame).
2️⃣ A small piece of black tape will be placed over your nose to reduce glare and ensure the highest image quality.
3️⃣ I will assess if your iris is fully visible—some people may need to gently pull down their lower eyelid for better exposure.
4️⃣ On the count of 3…2…1, you’ll be asked to look surprised/fearful—this helps expose the full iris while keeping your head still.
5️⃣ A few high-resolution images will be captured to ensure the best clarity, colour, and detail.
Tips for the best results during your iris photography session:
- Avoid wearing lash extensions and/or mascara. If you have long lashes and are willing to clip them, please do. Lashes are this genre of photography’s worst enemy. Anything that protrudes into the vision of the eye ball, gets reflected into the iris. Bear in mind that the final product does not show anything but your iris. For the best results shorter lashes without mascara are a winner.
- Avoid wearing contact lenses: For best possible results and to illuminate any possible risk of your contact lens causing unwanted distortion of your iris, please do remove them prior to your session. The distortion created by a contact lens that has perhaps moved or doesn’t cover the entire iris area cannot be removed in editing without destroying much of the original image thereby resulting in an image with a high percentage of AI which I personally try to avoid at all costs, therefore if you choose to wear your contact lenses to your session you accept any potential risks they may create in your final image.
- Practise raising your upper eyelid/brow. The vast majority who have attended my pop-ups have needed to raise their top brow to raise their upper eye lid so that the top of the eye could be seen/photographed. So practise in front of a mirror.Think surprised or horrified and really open them eyes! And just your eyes. Your lower jaw should not get involved. No mouth movements please. Just eyes and brows. For most, its quite possible, for others the top lid can be challenging. But practicing prior to your session will certainly help.
- Have a good nights sleep. In my experience, tired or hungover eyes have trouble opening. I’ve confirmed this myself using my own eyes. When I’m tired, despite my best efforts, I cannot raise my top brow enough to expose the top of my eye.
- Please don’t arrive under the influence of alcohol or drugs. These events are attended by families with young children. The venue and The Touring Eye are insured and with that insurance comes certain responsibilities. One such responsibility is to ensure that I reduce the risk to myself, other attendees and venue users. Both the venue and I reserve the right to refuse entry to anyone considered to be under the influence of alcohol or drugs.
- Younger children. As per the terms and conditions, I do not typically photograph people under 6 years of age. This photography, for the best results, requires both the head and eyes to be completely still for up to 10 seconds at a time. This can be challenging for adults let alone little ones full for energy. Whilst I would (and I actually provided newborn photography services when I had my home studio) love to photograph eyes of all ages, it’s just not photography that lends itself to objects that are not still. Iris photography is macro photography. And macro photography requires the subject to be as still as possible to get the detail sharp. The smallest movement of the head or eye will result in a failed / blurry shot. For this reason, parents booking for children under 6, or any age really, must be confident that their child is capable of keeping their head and eye still for a few seconds. They will also need to have their head on the optometrist style chin rest for up to a 3 – 4 minutes as the setup will need to be adjusted to their head size. I do not offer refunds if a good shot cannot be captured of any child under 6 or one that was unable to keep still. I have done just over 250 (as of 16th April ’25) eyes now and kids to struggle I’m afraid to say. Even older ones. As a father to two boys, I totally get it. There is way too much going on (my photography kit), its a new environment, I’m a stranger to them, there are bright lights and then they’re being told to sit still.
Step 3: Receive your unique iris as a digital image
🎨 Editing & Delivery Time:
The digital file is perfect for social media use or printing up to A5.
Your high-definition digital image will be professionally edited and delivered within 5 working days. This will be the initial classic edit which is included in your session fee. If you are considering ordering any effect prints please allow a further 5 working days to compile your unique effect!
Your effect edit, should you opt for one will not only feature your unique iris/es, but also a totally unique edit! Unlike many competitors, I edit my images by hand. I avoid using automations (actions) as I want each piece to be totally unique. Therefore, whilst you can absolutely use the examples I’ve provided on my iris photography page as guides, you will NOT receive the identical edit.
Step 4: Order your iris photography prints
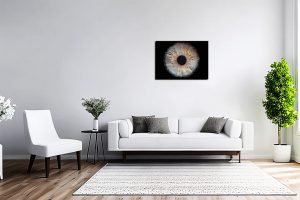
Want to turn your iris into a larger statement piece for your home or office? I offer a range of printed products featuring your unique iris design.
🖼 Print Options Available:
✔️ Explosion – A vibrant, high-energy edit with dynamic effects.
✔️ Clash – A striking contrast of colours and textures.
✔️ Infinity – A mesmerising, continuous iris pattern.
See examples of my iris photography edits here.
📦 Ordering & Delivery
Your custom artwork will be edited within 7 days and sent to the printer who will deliver to your door within 21 days (though most arrive within 7-10 days).
Choose your preferred edit style, print size, and format.
Securely pay online for your order.
Step 5: Gasp
At the stunning artwork delivered to your door.
A truly unique, one of a kind piece to show off in your home or office.
Iris photography is one of very few (any?) products that can call itself unique.
I’ve not heard of anyone doing fingerprint photography yet. Mmmm, possible business idea here?
So there you have it, what you can expect from your iris photography photoshoot.
Ready to Capture Your Own Iris?
📸 Learn more about my iris photography services including frequently asked questions.
📍 Check out my latest pop-up events: Book Your Iris Photography Session Here
📩 Want early access to new locations and special offers?
Sign up for my VIP mailing list to get exclusive updates on upcoming iris photography events across the UK!
Leave a Reply
You must be logged in to post a comment.